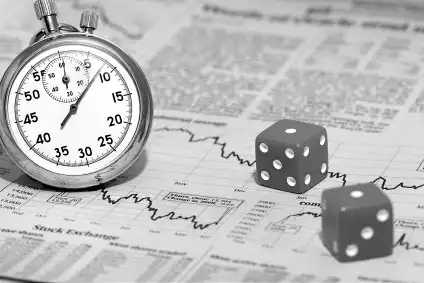
Particularly in choppy market conditions like those seen of late, traders are at heightened risk for those dreaded "false breakouts," which can suddenly ruin what seem like winning trades in their early stages. And for any traders out there who—like us—won't stand for sustaining max losses of 1-2% each time a good set-up somehow turns sour, you can do what we do: Opt for "combative" trade management instead!
Particularly in choppy market conditions like those seen of late, traders are at heightened risk for those dreaded "false breakouts," which can suddenly ruin what seem like winning trades in their early stages. And for any traders out there who—like us—won't stand for sustaining max losses of 1-2% each time a good set-up somehow turns sour, you can do what we do: Opt for "combative" trade management instead!
Like it sounds, "combative" trade management is a more active approach to handling your trades in progress. An important component of the Lazy Trader methodology, this practice aims to tighten up risk once trades begin moving in your favour, effectively locking in profits and reducing max risk from the full amount (1-2% per trade), often to just a fraction of it. Over time, combative trade management can preserve thousands worth of account capital, not to mention offer more comfort and peace of mind throughout your continuing trading endeavours.
What follow are three (3) specific and easy-to-follow methods for implementing combative trade management as part of your regular trading operations:
The firm's main research and development office is based in Tel Aviv Israel. It originally specialized in Forex and indices spreadbetting and CFDs but has recently expanded in stock trading also.
At the time of writing, eToro has 2.2 out of 5 star on Trust pilot. The comments suggest that the platform offers some impressive features but withdrawing money can be difficult. Having said that, some of the negative reviews appear to be rants rather than constructive criticism. This can be examples of traders losing money through their own recklessness rather than eToro's fault. You should therefore take this reviews with a pinch of salt.
“the platform offers some impressive features but withdrawing money can be difficult.”
76% of retail investor accounts lose money when trading CFDs with this provider.
OANDA is a global financial services company providing advanced currency solutions to both retail and corporate clients all over the world. In this article, we are going to review this broker’s trading options, tools, platforms, spreads, commissions, security measures, and educational resources to help traders make the right choice.
76.6% of retail investor accounts lose money when trading CFDs with this provider. You should consider whether you understand how CFDs work and whether you can afford to take the high risk of losing
AvaTrade offers a wide variety of trading solutions (spread trading, CFDs, and social trading), and peace of mind with its comprehensive regulation, covering the EU, Australia, Canada and South Africa. Clients can use a variety of platforms for discretionary and automated trading.
76% of retail investor accounts lose money when trading CFDs with this provider.
Offers multiple asset classes, platforms, and regulated in a variety of regions. Caters for a global audience. Awarded with the Highest Overall Customer Satisfaction Award for 5 years running - Investment Trends CFD Report 2015.
A standalone copy-trading ecosystem, providing equities, foreign exchange, commodities and cryptocurrencies markets. Provides a global selection of brokerages.
Pepperstone is a global regulated broker that provides its clients with the latest technologies for trading multiple assets such as Forex, indices, cryptocurrencies, stocks, ETFs, and commodities. This article provides an overview of its trading platforms, tools, fees, protection measures, and other aspects to help traders make a more informed decision.
3 "Combative" Trade Management Practices That Work
Needless to say, responsible trade management always begins by placing a hard stop-loss in the market at a predetermined point as a condition of trading. This would be true whether using combative trade management, or any other proper method.
The differences, however, are that when using combative trade management, you'll prudently manipulate your stop loss during the trade in order to tighten up on risk and preserve early profits in the event that a trade begins to move in your favour.
Here are three (3) distinct options for doing so:
Move Stop to Breakeven
The first bar or two following trade entry can often be the most tenuous. That's when false breakouts occur, which see you get triggered into the trade with one bar just before the market suddenly flashes a contrary signal in the "wrong" direction with the next. We faced a similar situation in NZDJPY this past week, as covered here in the Market Insider Webinar (subscription required for viewing).
Often, in these cases, you don't want to abandon the trade altogether, but you also must protect against a max loss. And that's why, before the market has a chance to continue on and reach your stop loss, combative trade management may compel you to move your stop to breakeven once the trade is triggered and begins heading in the desired direction. This way, even if the next daily bar, for example, reverses as part of a false breakout, the worst that would stand to happen if the reversal continues is a flat outcome (excluding trading costs, of course.)
Because this result is much better and less expensive than sustaining a max loss (1-2% of account capital), it may be preferable to capitalize on any opportunities to move your stop to breakeven once a trade goes in your favour early on.
A recent, short-term bottom in USDJPY set the stage for a potential buy set-up targeting (initially, at least) the midpoint of the preceding downtrend (see image below). And as it turned out, once triggered into the trade by the bullish pin bar reversal, the market headed swiftly higher, generously rewarding our new long position.
For traders at that juncture, though, trade management becomes key to protecting those early profits while also remaining in position to maximise opportunity flow and catch any continued bullish price action. That's why we don't opt for selling out of the position altogether. Instead, we scale out, or sell a portion of the position—half, to be exact—while leaving the remainder to run.
In fact, scaling out is the second option we consider whenever opting for combative trade management. As a rule, we often choose to apply this strategy once a trade reaches 1:1, and given this particular trade's reward/risk profile, 1:1 was very close to the halfway point of the targeted move.
Using this trade management methodology, the trader effectively banks their early profits, and keeps a second half of the position "on" and well positioned to profit from continued upside movement. Risk-minded traders would, however, want to adjust the stop on the remainder of the position, perhaps opting for breakeven, as we covered in the previous section, or using the third combative trade management strategy, which we'll discuss in the following section:
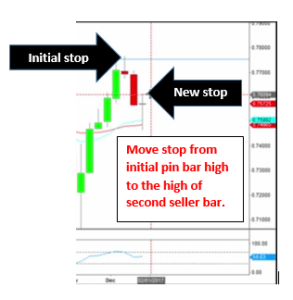
Use a Trailing Stop behind Every Second Buyer/Seller Bar
The image at right depicts yet another combative trade management method which is also acceptable under Lazy Trader protocol. This method would call for a trailing stop to be placed at the high of every second seller bar (for short trades only). In this case, the trailing stop is placed at the high of that tiny bullish pin bar reversal that printed the previous period.
(Note that the trade management strategy would be the same, only in reverse, if this were a long trade, as the trailing stop would be placed at the low of every second buyer bar.)
Aggressively trailing the stop in this manner will better protect the trader from giving back hard-earned profits in the event that the choppiness—and the apparent pullback—continued.
The tradeoff, of course, is that you could wind up being stopped out of the trade if the downward trend were ultimately to resume following a more sizeable pullback to the up side. If that occurred, however, we would simply be forced to head out in search of a new, potential entry opportunity.
Discover our latest trade ideas and learn more about the combative trade management techniques we apply when you join the Lazy Trader member community. You'll receive real-time market updates and analysis, timely trade set-ups, a wealth of continuing education, and much more. Simply click the banner below to activate your no-risk trial today!


 Needless to say, responsible trade management always begins by placing a hard stop-loss in the market at a predetermined point as a condition of trading. This would be true whether using combative trade management, or any other proper method.
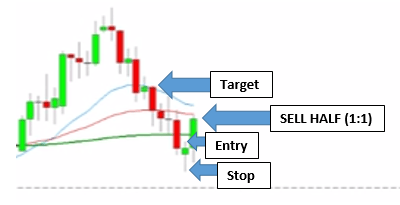
 The image at right depicts yet another combative trade management method which is also acceptable under Lazy Trader protocol. This method would call for a trailing stop to be placed at the high of every second seller bar (for short trades only). In this case, the trailing stop is placed at the high of that tiny bullish pin bar reversal that printed the previous period.