Rather quiet trading conditions have prevailed in the first few sessions of 2017, and even though valid new opportunities have been scarce, Lazy Traders have had important responsibilities nonetheless, as key trade management decisions were made regarding open positions in CADCHF and SGDJPY.
The firm's main research and development office is based in Tel Aviv Israel. It originally specialized in Forex and indices spreadbetting and CFDs but has recently expanded in stock trading also.
At the time of writing, eToro has 2.2 out of 5 star on Trust pilot. The comments suggest that the platform offers some impressive features but withdrawing money can be difficult. Having said that, some of the negative reviews appear to be rants rather than constructive criticism. This can be examples of traders losing money through their own recklessness rather than eToro's fault. You should therefore take this reviews with a pinch of salt.
“the platform offers some impressive features but withdrawing money can be difficult.”
76% of retail investor accounts lose money when trading CFDs with this provider.
OANDA is a global financial services company providing advanced currency solutions to both retail and corporate clients all over the world. In this article, we are going to review this broker’s trading options, tools, platforms, spreads, commissions, security measures, and educational resources to help traders make the right choice.
76.6% of retail investor accounts lose money when trading CFDs with this provider. You should consider whether you understand how CFDs work and whether you can afford to take the high risk of losing
AvaTrade offers a wide variety of trading solutions (spread trading, CFDs, and social trading), and peace of mind with its comprehensive regulation, covering the EU, Australia, Canada and South Africa. Clients can use a variety of platforms for discretionary and automated trading.
76% of retail investor accounts lose money when trading CFDs with this provider.
Offers multiple asset classes, platforms, and regulated in a variety of regions. Caters for a global audience. Awarded with the Highest Overall Customer Satisfaction Award for 5 years running - Investment Trends CFD Report 2015.
A standalone copy-trading ecosystem, providing equities, foreign exchange, commodities and cryptocurrencies markets. Provides a global selection of brokerages.
Pepperstone is a global regulated broker that provides its clients with the latest technologies for trading multiple assets such as Forex, indices, cryptocurrencies, stocks, ETFs, and commodities. This article provides an overview of its trading platforms, tools, fees, protection measures, and other aspects to help traders make a more informed decision.
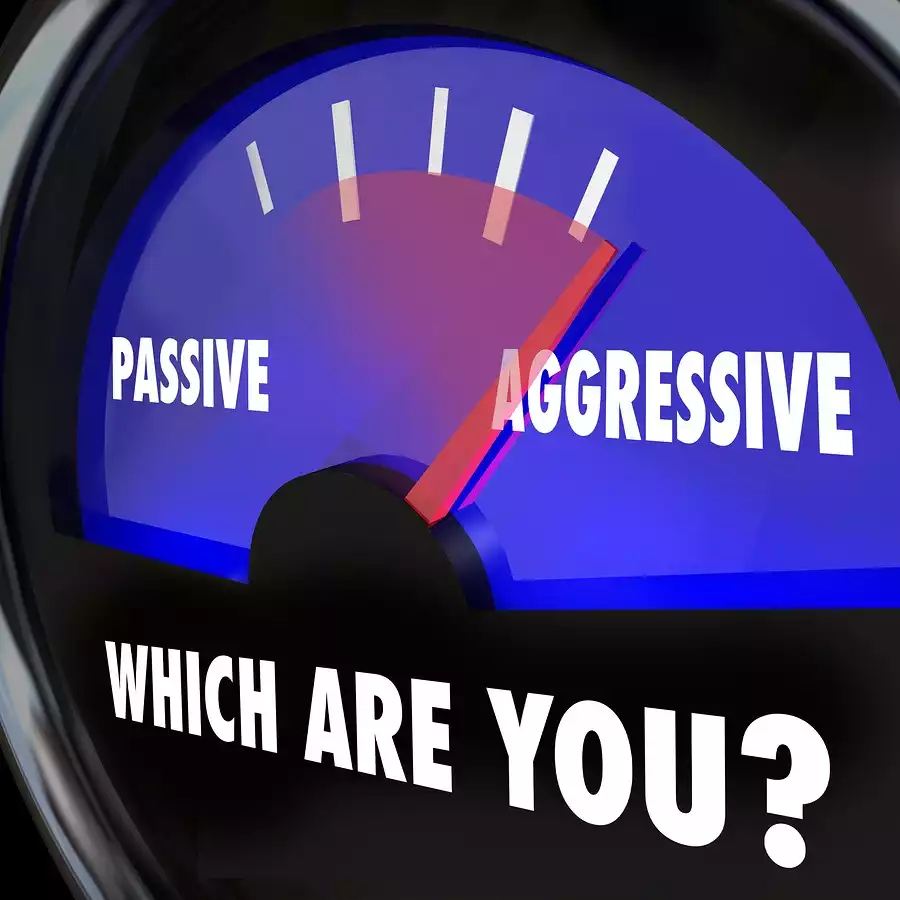
How our traders ultimately arrived at their respective decisions, however, varied quite a bit according to each individual trader's own risk tolerance and trade management philosophy. In essence, there are passive and more aggressive ways to tackle trade management, and no method is any more "correct" than the other.
Each one of you is free to choose what makes you most comfortable, and to help you decide, here's a little "quiz," if you will, to determine whether you are (or should be) passive or aggressive about trade management, and how you'd be advised to manage your trades in either scenario.
Choose a Trade Management Approach…
Bear in mind that trade management entails quite a bit more than just how you choose to trail (or not trail) your stop loss as your position unfolds. Your individual approach to trade management may also affect when and how you scale in or out of trades, where you place your initial and longer-term price targets, and what, if anything, will cause you to abandon or invalidate a trade in progress.
Perhaps ironically, though, those who are aggressive with regard to trade management are actually more conservative traders. Their more aggressive and hands-on actions are intended to preserve and protect hard-earned profits, while passive trade management will typically be for more risk-minded traders who want to allow trades as much time and space as possible to create the biggest profit, or result in an another accepted outcome like breaking even, or in some cases, stopping out.
To determine whether aggressive or passive trade management is more your speed, read the statements below and see which category best describesyour unique trading personality:
Statements in Favour of Aggressive Trade Management
"Once a trade has begun working in my favour, I tend to feel pressure not to give back those hard-earned profits."
"Even run-of-the-mill pullbacks within the course of a trend move sometimes make me uneasy, like the momentum might be weakening."
"I'm happy taking small wins any day, knowing that those can add up over the long term."
Statements in Favour of Passive Trade Management
"I'm constantly trading in search of those large and decisive trend moves, the kind that result in the biggest profits."
"Normal-looking pullbacks within the course of a trend move often excite me, like the market may be gearing up for an even bigger push back in the direction of the trend."
"A breakeven outcome is always an acceptable one when putting capital to work in the markets."
…And How to Manage Your Trades Accordingly
I suspect that you probably didn't need any "quiz" to tell you in which camp you happen to fall when it comes to trade management, but perhaps reading through the above statements just provides a little validation. Now, using real market action as our example, we can take a look at different ways for managing trades depending on whether you're in the aggressive or passive camp.
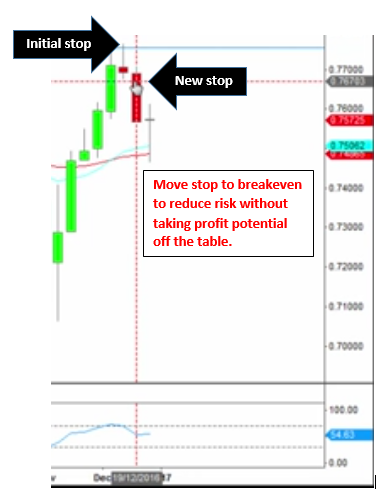
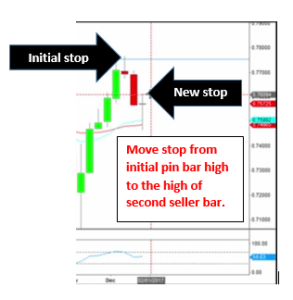
Not that it's especially important, because these rules would be the same regardless of the asset or currency pair being traded, but the below examples happen to be in CADCHF (on the weekly chart, in fact), which reversed lower recently from overhead resistance in the form of an established range boundary. As you can see on the chart segment below, a bearish pin bar reversal triggered us into the trade, and after a swift and sizeable move in our favour, the pair printed a bullish pin bar reversal around the holidays.
As this is not ideal for bearish trend continuation, trade management has been on our minds of late, but the decision of when and how to move our stop in order to protect our early profits is a subjective one that depends on how aggressive (or passive) you want to be. First, the image at right depicts the more aggressive trade management method, which is better suited for more risk-averse or conservative traders. This method would call for a trailing stop being placed at the high of every second seller bar, which, in this case, is at the high of that tiny bullish pin bar reversal that printed during extremely thin trading conditions the previous week.
(Note that the strategy would be the same, only in reverse, if this were a long trade, as the trailing stop would be placed at the low of every second buyer bar.)
Aggressively trailing the stop in this manner will better protect the trader from giving back hard-earned profits in the event that the "pullback" continues. But the tradeoff, of course, is that you could wind up being stopped out of the trade and need to find a new entry opportunity in the event that the downward trend were to continue following a sizeable pullback.
As shown at right, the passive trade management approach, on the other hand, would ensure that the trader could not lose money on a trade that worked so well in their favour early on, but would also leave more room for a correction to materialise. Notice how the stop is still being trailed, although more passively this time, as it's moved from the initial placement at the high of the initial trigger bar, down to breakeven. This is done to effectively eliminate downside risk on the original trade idea without sacrificing profit potential in the process. As you can see, a larger pullback would now be possible, but the trader would remain in the trade and suitably positioned to capitalise on a new push back in the direction of the prevailing trend. Again, neither of these trade management methods are "better" than the other. Instead, it's simply a choice that's left to each individual trader to make depending on their own unique risk profile and trading objectives.
So which trade management method would you have chosen, and why?


 As this is not ideal for bearish trend continuation, trade management has been on our minds of late, but the decision of when and how to move our stop in order to protect our early profits is a subjective one that depends on how aggressive (or passive) you want to be. First, the image at right depicts the more aggressive trade management method, which is better suited for more risk-averse or conservative traders. This method would call for a trailing stop being placed at the high of every second seller bar, which, in this case, is at the high of that tiny bullish pin bar reversal that printed during extremely thin trading conditions the previous week.